Recipes, cooking instructions, dog tips, movie reviews and more!
Category: Recipes ~ first shelf
These are some of my all time favorite recipes, many of which I made my own, based on decades for the love of cooking. Many of these are Keto friendly recipes, as notated.
There’s nothing more welcoming to the tummy, just as the brisk of fall chill hits the air. I found a similar recipe a million years ago, (when the internet was first born), and can no longer find it, but have made enough of my own additions, that it’s simply perfect comfort food ala yours truly. This low-carb soup will keep you smiling through each spoonful~!
Always start with all your ingredients, prepared and measured out fully.
Even though you always want to measure everything out, be sure to put the cream base back in the refrigerator while the rest of the dish is cooking. Be sure you keep it on simmer for the 45 minute cook time, not a running boil.
Ingredients
6 slices of bacon, fully cooked, chopped into chips size portions. The bacon should be divided.
1 large white onion, chopped coarsely
4 stalks of celery, use the leaves, coarsely chopped
3 leeks of medium size, coarsely chopped
3 cups of chicken broth (either homemade or low to no salt)
2 teaspoons of sea salt
1 teaspoon of white pepper
1/2 teaspoon of black pepper
1/2 teaspoon of nutmeg
1/2 teaspoon of paprika
12 oz. Kielbasa sausage, (full horseshoe)
1/2 cup of heavy cream, (or whole milk)
1/2 cup of cashew milk, (or coconut milk)
Use the largest frying pan you have, I use a wok which works perfectly.
Directions
Make sure all ingredients are measured out, and be sure the bacon is chopped and divided.
With oil in the wok, heat over medium high heat until just about smoking. Carefully place the celery, leeks, and onion in the wok. Stir fry for about 10 minutes.
Pour in the chicken broth, the chopped 1st portion of the bacon, and the salt, peppers, nutmeg and paprika. Stir to incorporate.
Place the whole (in tact) Kielbasa sausage into wok and press it down.
Reduce the heat to low, there should be only small bubbles if any coming up. Set the timer to simmer for 45 minutes.
Once the 45 minutes are up, turn the burner off and take the Kielbasa out of the skillet, set on a butcher block to cool off.
Give it about 20 minutes to let the broth cool down and then start to put them in either a blender or a food processor. (May take several rounds). Puree the soup until thick and creamy. Pour back into the wok.
The Kielbasa should be cooled enough now to handle. Take a knife and gently cut the sausage until it pierces the skin – then cut towards you, one continuous length of the sausage. From the cut edge, start to peel off the skin from all of the sausage. (Note: my dogs go crazy for that outer shed~!)
Chop the Kielbasa in small rings. The thinner they are sliced, the more the soup will taste like it has lots of sausage in it.
Now take your 2nd portion of the chopped bacon and add it to the soup along with the chopped Kielbasa. Add the cream base and keep it under low heat for a few minutes until completely warmed up (do not boil).
Adjust with salt and pepper before serving. Walla~!
The Kielbasa sausage should be place ‘whole’ in the soup mixture to simmer for 45 minutes.
You slice just enough to break the skin all the way down, one length of the entire sausage. Then peel off the skin.
This is what your Kielbasa will look like after the skin is removed. Note, I should have chopped them even thinner~!
I have always loved brownies. I eat them slowly over time and I really don’t like when they start to turn hard. I perfected this recipe which will keep your brownies soft and moist for weeks, whether you keep them covered on the counter or covered in the refrigerator. The tip is not to use any flour – at all. Enjoy this with a delicious peanut butter/chocolate topping or a German Chocolate frosting.
Ingredients
For the basic brownie bake:
3 large eggs at room temperature
1 can of pumpkin puree
1 cup of Swerve (or sugar substitute of your choice)
2 tablespoons of pure maple syrup
3 tablespoons of unrefined coconut oil, melted
2 teaspoons of vanilla extract
1 cup sugar free dark chocolate powder
1 teaspoon of baking soda
1/2 teaspoon of sea salt
1/2 cup of dark sugar free chocolate chips (Lily’s brand that is sugar free)
1/4 cup of 85% coco bar, chopped
Directions
Preheat your oven to 350 Fahrenheit and line an 8×8 baking dish with parchment paper.
In a large bowl, whisk together the pumpkin, eggs, coconut oil, Swerve sugar substitute, Maple syrup, and vanilla.
In a separate bowl, sift the cacao powder, baking soda and salt, whisk to combine.
Slowly stir in the dry ingredients into the wet until well combined (do not use a mixer).
Fold in the chocolate chips and the chopped chocolate bar to the wet ingredients until well combined.
Bake in preheated over for 22-45 minutes or until center appears set. Do not over-bake the brownies.
Let the brownies cool for 1 hour at room temperature.
Ingredients
For the Peanut Butter/Chocolate topping
1/2 cup of natural, low sugar peanut butter
1/4 cup of unrefined coconut oil
1 teaspoon of Vanilla flavored liquid Stevia and dash for chocolate
1/2 cup of sugar-free dark chocolate powder
1/4 cup of unrefined coconut oil (melted)
Directions
In a microwave safe bowl (or double broiler) heat the peanut butter and 1/4 cup of coconut oil until peanut butter is soft to work with.
Add the Liquid Stevia and whisk until all is well combined.
Make sure the brownies have been fully baked and cooled for at least 1 hour. Add the peanut butter mixture on top. You can even poke holes in the brownies and then add the peanut butter mixture to incorporate more directly into the brownies. Fully cover the top of the brownies with all the peanut butter mixture and set the brownies in the refrigerator for 15 minutes.
In a bowl, mix together the 1/4 cup melted coconut oil and the powder chocolate until well combined. For extra sweetness, add a dash of liquid vanilla Stevia.
Once the brownies have chilled for 15 minutes, take them out of the refrigerator and pour the chocolate mixture over the top of the peanut butter to fully cover. Now cover the brownies, sealing with tin foil and put in the refrigerator for at least 15 minutes – the top chocolate will form a firm shell with peanut butter under it and the moist brownies below all.
Ingredients
For the German Chocolate topping
1/2 cup half and half
1/4 cup butter
3/4 cup of Swerve (or your desired sugar substitute)
1 teaspoon vanilla extract
2 egg yolks
1/2 tablespoon of cornstarch
1/2 teaspoon of sea salt
3/4 cup of shredded, sugar free, coconut
1/2 cup of chopped, toasted, peacans
Directions
Once the brownies have cooled to room temperature, in a medium saucepan, combine the half and half, butter, sugar substitute, vanilla extract, egg yolks, cornstarch and sea salt. Whisk until well blended. Bring it to a boil over medium heat. Once it starts boiling, remove it from the heat, stir in the shredded coconut and pecans. Allow the mixture to cool slightly.
Spread frosting mixture over the top of the brownies, cover in tin foil and let it set in the refrigerator for at least 15 minutes before serving.
Triple Chocolate Keto Brownies ~ with the German Chocolate Frosting topping.
This brownie recipe will stay moist for weeks, whether you refrigerate or keep at room temperature, all you have to do is keep it covered. Enjoy~!
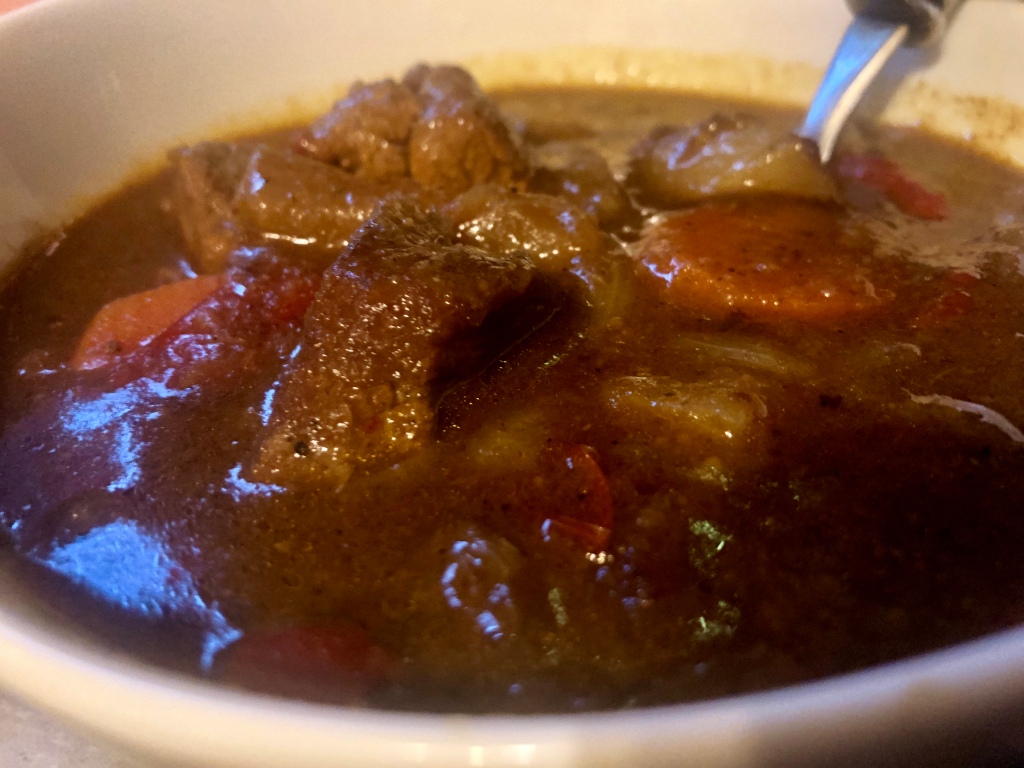
A delicious thick stew with lively curry taste in the tradition of Japanese Beef Curry. A perfect, delicious meal in a bowl.
It’s important to have all ingredients measured out and ready to go before you start.
Ingredients
2 pounds of beef cubes (brisket, short ribs or other desired cuts), cut into bite-sized cubes
3 tablespoons of cornstarch
2 teaspoons of salt
1 teaspoon of black pepper
1 teaspoon of white pepper
1 teaspoon of Old Bay
2 tablespoons of bacon grease (best for flavoring the beef)
3 Tablespoons of butter
2 large onions, thinly sliced
4 medium carrots, peeled and cut into wedges
1 large red bell pepper, cut into 3/4 inch strips
1 tablespoon of fresh ginger, minced and finely grated
2 cloves of garlic, finely chopped
5 cups of beef stock (if you buy a 32oz container, you can add 1 cup of chicken stock or 1 cup of water to make a total of 5 cups)
1 large apple (Macintosh or Gala)
1 tablespoon salt
1 large potato (Idaho), cut into bite-sized pieces
For the roux:
1/2 cup of butter
7 tablespoons of coconut flour (you can use regular flour for non-Keto)(Link at bottom of page where you can find coconut flour)
1 1/2 teaspoons of Xantham powder (omit if you used regular flour) (Link at bottom of page where you can find it)
2 tablespoons of Madras curry powder (needs to be this curry) (Link at bottom of page where you can find it)
2 tablespoons of Garam Masala (needs to be this spice) (Link at bottom of page where you can find it)
Directions
In a large bowl , place the cornstarch, salt, black and white peppers, Old Bay and mix to combine.
Rinse the beef in cold water and pat dry with paper towels (don’t skip this step).
Add the beef to the cornstarch mixture and fully cover all chucks so they have an even distribution of the cornstarch mixture (I use two large spoons to scoop and toss, like a salad).
Place 1 tablespoon of the bacon grease in a large frying pan, and heat on medium heat until very hot and just about smoking.
Place the cubes of beef in the frying pan and fry for 3 to 4 minutes turning frequently to get a good char on all sides of the cube, when done, place in a large bowl lined with paper towels to absorb the oil. Note: This will have to be done in batches. When pan becomes dry, add the second tablespoon of bacon grease. You are not trying to ‘cook’ the beef through, you just want a good char on the outside, the beef will cook in the stew).(See photo A below).
Melt the butter in a stockpot large enough to hold 5 quarts of liquid, over medium heat. Add the onions, carrots and red bell pepper strips. Stir and cook for about 5 minutes until the onions become translucent. (See photo B below).
Now add the ginger and garlic, stirring until fragrant, about 1 minute.
Add the beef cubes, beef stock, apple, and salt, bring it to a boil over high heat and then turn the burner down and simmer uncovered for 20 minutes, stirring occasionally (Be sure to stir and scraping the bottom of the sauce pan to make sure nothing is sticking to it).
Meanwhile make the roux; In a skillet, melt the butter over medium heat and add the flour. Stir, (constantly stirring) until the butter and flour fuse and swell. Don’t stop stirring, or the roux will burn! After about 8 minutes of whisking, turn the burner down to medium low. After about 20 minutes of continual whisking, the roux will become a deep tan color. At this point, add the Madras Curry and Garam Masala, and cook, stirring for 30 seconds, until the spices release their aroma. (See photo C below). Turn off the heat. Add a ladleful or two of the cooking liquid from the stock and mix into a paste in the pan stirring to combine.
Add the roux paste into the stockpot, and stir to combine. Add the potato. Simmer uncovered on low heat, stirring occasionally. Cook, simmering, for 1 hour, stirring occasionally, including the bottom, until the beef becomes tender and the curry thick. (See photo D below).
Enjoy~!
Photo A: Coating the beef with starch and frying in bacon grease ‘holds’ the curry sauce to it.Photo B: Stir the veggies over medium heat for 5 minutes or until onions become translucent. Photo C: Once you’ve mixed the flour mixture with butter, stirred for 20 minutes on low heat, add the two curry spices and stir for about 1 minute, turn off heat, add two ladles of broth and mix well – then add to the curry paste to the pot and stir well.Photo D: Finished version, note the dark curry thick stew. Enjoy~!
A delicious, no taste compromised, creamy chocolate delight~! All the wonderful taste, none of the sugar~!
Ingredients
1 cup heavy cream
1 cup of unsweetened almond milk
1/4 cup dark chocolate cocoa powder
1 large egg
3/4 cup of Swerve (or your choice of sugar substitute)
2 teaspoons of xanthan gum
2 avocados, pealed and chopped
1 ounce of Grand Marnier (optional – but adds a nice tang to it)
1 teaspoon of vanilla extract
1 teaspoon of Stevia vanilla cream liquid
2 teaspoons of sea salt and dash for garnish
shaved 80% cocoa bar for garnish
sugar free whipped topping
Directions
In a medium sauce pan over medium low heat, combine the heavy cream, almond milk, cocoa, egg and the two teaspoons of sea salt. Whisk until well combined.
In a small bowl add the Swerve (or whichever sugar substitute you are using) and the Xantham gum. Mix well. (Do this first before adding to the liquid to prevent clumping).
While whisking the cream, slowly add the Swerve/Xantham gum. Whisk it vigorously until all is combined. Keep whisking over heat, but do not bring it to a boil, it should get to a consistency that is thick and sticks to the back of a wooden spoon. Turn off heat and let it slightly cool.
In a food processor, add the 2 chopped avocados, make sure they are at the bottom on the blades as the avocado tends to rise to the top and you’ll have to constantly push them back down.
Add the pudding to the processor and top with the Grand Marnier (if using) the vanilla extract, and the Liquid Stevia. Pulse until all is well combined. You may need to use a spatula to push the sides down to combine. It will ultimately be a thick pudding mixture with no visual bits of avocado when finished.
Taste the pudding to see if it needs more salt and/or sugar substitute. If so, add and blend. Pour into individual bowls and top with one, or all three, of these; shaved chocolate bar, sea salt, whip cream, and serve. Or, chill in the fridge for 2-4 hours to have a more ‘set’ pudding and then serve with toppings.
I absolutely love the bitter taste of Broccoli Rabe and it almost always complements a main dish. This recipe uses roasted garlic and roasted red peppers (recipe link for them below). Enjoy~!
Ingredients
1 bunch (usually comes as 1lb in grocery store) of fresh Broccoli Rabe
3 tablespoons of good quality extra virgin olive oil
1 head of Roasted Garlic (see link for my recipe below)
1/2 cup of Roasted Red Peppers (see link for my recipe below) cut into 1/4 strips – 1 teaspoon of chopped garlic
1/4 teaspoon of crushed red pepper
1/2 cup of no salt chicken broth (for best flavor, or you can use water)
Sea salt
Directions
Trim the very ends of the broccoli rabe stems and discard. Using a sharp knife, split the stem in half and then again to make a cross (the stem will be split out in 4 sections) – cut down about an inch on each stem.
Wash the broccoli rabe in a colander with cold water. Let it set a few minutes so the water washes off any dirt. Set the broccoli rabe aside in a bowl.
Using a large frying pan, fill the pan with the olive oil. Set burner to medium high heat and let it get hot, until just about smoking, and then add the teaspoon of garlic and fry for only about a minute (watch this step closely – garlic can burn very easily).
Add the broth (or water) and turn the burn down to a simmer.
Add the roasted garlic and the roasted red peppers, then carefully lay the broccoli rabe in the pan (be careful the contact may spatter).
Spread the crushed red pepper over the top and lightly salt it all. You may have some of the broccoli rabe spilling over the pan, just tuck it all in and place a lid over the frying pan. Be sure your burner is set to simmer.
Simmer for 10 to 15 minutes – stirring occasionally, until desired consistency – broccoli rabe should have a slight firmness to the stem.
Italian Sausage, Peppers & Onions, a summer staple in my Brooklyn neighborhood. Pair this with a side of Brion's Broccoli Rabe (see link at the bottom for my own Broccoli Rabe recipe). This dinner goes best with a good Italian Chianti. Salute~!
Ingredients
3 pounds of Italian Sausage (I like to get half hot-n-spicy and half sweet)
2 medium red bell peppers
2 medium green bell peppers
2 medium orange bell peppers
2 medium yellow bell peppers
2 medium Anaheim peppers
2 large Spanish onions
4 tablespoons of good quality extra virgin olive oil
1 teaspoon of sea salt
1/2 teaspoon of black pepper
1/2 teaspoon of white pepper
1 tablespoon of Red Wine Vinegar
2 teaspoons of chopped garlic
1/2 teaspoon of dry basil
1/2 teaspoon of dry oregano
1/4 teaspoon of red pepper flakes
Fresh chopped basil (garnish)
Fresh grated parmesan cheese (garnish)
Directions
Pre-heat the oven to 425 Fahrenheit.
Rinse the peppers over warm water (to remove any wax) and then core stems and remove along with seeds. Cut them into 2 inch chunks and place in a large bowl.
Cut and peel the onions and chop into 2 inch chunks. Place in a separate bowl.
In a measuring cup mix the Red Wine Vinegar, olive oil, chopped garlic and miix well.
Pour half the oil/vinegar mixture over the bowl with the peppers and pour the other half over the bowl with the onions. Use your hands to mix the oil in both bowls so all the peppers and onions are covered.
Line two baking sheets with tinfoil. Place the peppers on one of the baking sheets in a single layer. Place the onions on the second baking sheet in a single layer.
Sprinkle both bowls with sea salt, black and white peppers, dry basil, dry oregano, and the red pepper flakes.
Bake both baking sheets in the pre-heated oven for 30-40 minutes. There should be a char on them when finished.
Take out the peppers and place in a large metal bowl, cover lightly with tinfoil to keep warm and leave the onions in the oven for another 10 minutes to caramelize.
Take the onions out and place in the bowls with the peppers.
Take your Italian Sausage and place on the broiler (setting your oven now to ‘broil’). Set on the lowest shelf and what closely, most only take about 3 minutes to char on one side, flip them so all sides get flame cooked, about 10 minutes total in time (but watching closely and flipping frequently).
Take the sausage out when fully cooked, and cut into 1/2 inch pieces. Add to the bowl of peppers and onions and lightly pour some olive oil over all of it and toss. You can turn off your oven which should still remain hot, and put the metal bowl of Sausage, Peppers & Onions in the oven for a few minutes to evenly heat everything. Serve with a bed of Brion’s Broccoli Rabe (recipe link below).
It's easy to make your own roasted garlic (pimentos) and roasted garlic. Both add delicious flavors to recipes that call for them. It's best to have good 'sealed' jars to use for the peppers. You can make both of these at the same time.
Ingredients
For the Roasted Peppers
3 medium or two large Red Peppers (you can also use a variety of colored peppers, depending on your taste)
1/4 cup of good grade extra virgin Olive Oil
1/2 teaspoon Crushed Red Pepper (optional)
Directions
Pre-heat your oven to 425 Fahrenheit.
Spread some oil on a lined baking sheet.
Take the peppers (whole) and wash them off with hot water (this helps remove the wax that most stores put on them).
Set the peppers on the baking sheet, once the oven is pre-heated pop them in the middle rack.
The peppers should bake for 30-40 minutes, but every 10 minutes you want to open it and flip them so they roast evenly. It’s normal and correct to see burnt char on the sides, just make sure you are flipping to get all sides.
Once they are done baking, take the pan out and immediately wrap the peppers individually in tinfoil. Note: this can be a challenge since the peppers are pipping hot. Have your measured tinfoil out and ready to just place them on it with tongs. After doing this, take the corners of the tinfoil and quickly fold them up pinching the ends to seal (you do not have to have it pressing against the pepper), the idea here is that the steam will make the removing of the skin much easier.
Wait at least 5 minutes and then open the tinfoil. Let the peppers cool down to where you can safely touch them. Peel off the skin (it should just fall off). Remove the core and seeds. Cut into 1/3 strips and place in your jar.
Fill your jar with the olive oil (it should just cover the peppers, add more if not) and crushed red pepper (if using). Keep the jar in the fridge as it can develop mold if you keep it at room temperature.
Note: You can place the roasted garlic, after prepped, on the same baking sheet as the roasted peppers for the baking process.
Ingredients
For the Roasted Garlic
1 head of garlic – intact
1 tablespoon of good quality extra virgin olive oil
Tinfoil to cover it with
Directions
As with the above roasted peppers, pre-heat the oven to 425 Fahrenheit.
Take the garlic head – if there are any loose skin, take that off (but don’t peel it). With a sharp knife, cut the first 1/4 of the garlic head off and discard top.
Place the garlic head on a sheet of tinfoil, and drizzle the olive oil over the top of the open head, using your fingers to rub the oil in.
Seal up the tinfoil to completely cover the garlic head and put it on a baking sheet – place in the pre-heated oven and let it roast for 30-40 minutes.
Take it out of the oven and let it sit until cool enough to handle. Once you can handle, you will see that each garlic pulp will neatly pop out. Store in an airtight container in the fridge or use right away in your favorite recipe.
Dog treats can be expensive, and when you look at all the ingredients they put in them, well, most are not the healthiest of choices. I like to know what exactly is in my treats and my boys, Gaspard and Marcel, absolutely love these Peanut Butter Bones.
Ingredients
2 1/4 cups whole-wheat flour (we use King Arthur ~ see bottom of page for link)
1 tbsp, baking powder
1/2 can of pure pumpkin (use the other half to add to their food – as pumpkin is very healthy for our furry loves and their digestive system)
1 cup of all natural peanut butter (chunky or smooth)
Note: make sure you are getting ‘All natural peanut butter’ otherwise you will be feeding your dog large doses of sugar laden peanut butter (the regular kind) – definitely not a healthy way to go. Also, it’s very important to know that in some countries, they make peanut butter, advertising it as light, lite, or sugar free or natural by using an artificial sweetener called “Xylitol”. You must read the labels of any peanut butter you are going to feed your furry love to see if the ingredient Xylitol is in it. Xylitol is complete poison for dogs and it will kill them, even in small doses. Please be sure to check all peanut butter labels before buying.
1 teaspoon of unrefined coconut oil (melted)
1/4 teaspoon of cinnamon
Note: there are two methods to make these treats. There is a product called Bake-A-Bone (much like a waffle iron, but shaped like dog bones, see below link to purchase), which we use, or you can use the oven method. I will leave instructions for both.
Directions
Instructions using the Bake-a-Bone machine:Note: Refer and fully read the Bake-a-Bone manual before operating to understand everything about it, including risks.
Start by plugging in your Bake-a-Bone, when the green light comes on, it’s ready to use.
Placing all ingredients in a large bowl. I take the peanut butter and put it in a microwave safe bowl and heat it for about a minute to melt it a bit – this makes it easier to work with. You can also put it over the stove in a double boiler, simmering water, for about 10 minutes to get the same affect.
With a strong, large, silicone spatula or spoon, start to mix everything up really well, it will become the consistency of a paste.
Open the Bake-a-Bone if the light has turned green. Using the spatula, put the batter in the Bake-a-Bone molds 1/8″ above each of the mold walls.
Close the lid and let it bake for 10 minutes (for safety reasons, use a timer).
Remove from Bake-A-Bone, trim off excess edges to make a clean ‘bone’ look. Cool on a rack for 30 minutes.
This method will yield a slightly soft bone treat that is ready to feed. If you would like to make them dry and harder, simply put them on a cookie sheet (when done baking in the Bake-a-Bone) and place them in a 250 degree Fahrenheit oven for 45 minutes. Then turn the oven off and let them sit in the oven for an hour.
Store the treats in an airtight container and refrigerate. (If you leave them in a treat jar at room temperature they could yield mold so definitely keep them refrigerated).
If you make a large batch, keep half of them in an airtight container in the refrigerator and half of them in an airtight container in the freezer. Thaw before serving the frozen ones.
Directions
Instructions for using your oven:
Pre-heat your oven to 350 degrees Fahrenheit.
Mix the same ingredients as listed above, but if the batter is too runny, add more whole wheat flour – you want it to form a texture like cookie dough. You can also add one egg to help make this texture.
After fully mixing, place the batter on parchment paper on a cookie sheet. Place another long strip of parchment paper over the top of the batter and roll it down until the batter is about 1/2 inch thick on the cookie sheet. Discard the top layer of parchment paper.
Using a cookie cutter of your choice, cut out the shapes of the treats, gathering excess dough and reshaping to use it all up.
Place the cookie sheet in the pre-heated oven for 40 minutes. Turn the oven off and let them sit in the oven for an hour. Allow to cool before feeding and storing in airtight container in the refrigerator or storing in the freezer.
Note 1: You can also buy silicone pre shaped molds (see below link) – we have this as well, because you can make other kinds of treats that you can freeze for those hot summer months when they need a cooling down treat.
Note 2: Remember that often our furry loves are much smaller than we are. One treat bone can be the equivalent of humans eating it at the hotdog size portion. Feed your dog sparingly or use them as special rewards but don’t over feed them treats or use them as a supplement for their food. Trust me, they will love these and continually ask you for more~! Happy treat eating~!
Please keep in mind that all dog tips should first be consulted with your vet to make sure they fit the needs and special instructions your furry love’s Dr. advises. Especially with food that you give them.
A great breakfast or anytime treat~! This sandwich is 'bread-less', as the prep of the egg and the cheese seal it. Don't be afraid to do the 'flipping' of it - I was scared at first, it really turns out great when you do it~! Do not add any salt, the cheese will already be salty. Enjoy this cheese filled crusty hot ham sandwich I've perfected~!
You will need two frying pans to make this dish, one small and one medium, see photos below.
Ingredients
3 tablespoons of butter, cut into 4 halves
2 Extra large eggs (at room temperature)
1 ounce of half and half or you can use sour cream, or whole milk
1/2 tablespoon of Seltzer water (which makes the egg more spongy for the ‘bread’ portion)
2 large slices of ham (any ham choice, or you can also use pepperoni)
2 tablespoons of sliced pimentos (cut lengthwise)
1 cup of shredded mozzarella cheese
1 teaspoon of Pesto Sauce (optional)
1 scallion, chopped
1/2 teaspoon of Cumin seeds
1/2 teaspoon of Italian seasoning
1/2 teaspoon of Old Bay seasoning
1/2 teaspoon of pepper
Directions
Start by measuring everything out and having it at hand.
Place one of the butter halves in the larger frying pan and melt it to just bubbling, add the ham and slowly (medium low burner) fry it until there is a nice char. Remove from pan and place on a plate with a paper towel to absorb the oil.
Place eggs in a cup, add the half n half (or whichever cream base as listed above) and the Seltzer water. Whisk the eggs until it’s fully combined and all one pale yellow color. Add the pesto (if using), Old Bay, Italian seasoning, and pepper, and whisk again until well combined.
Put another halved butter slice in the small frying pan. Let it melt over medium low heat until just bubbling (make sure it’s covering the full frying pan). Place the scallions and the cumin seeds in the pan with butter and fry for about a minute until fragrant. Now pour your egg mixture onto it. Do not touch the egg mixture in the frying pan, let it slowly fry undisturbed. Add the ham slices and pimentos on top right away, then add the shredded cheese which should cover everything. Let this fry for 3 minutes on medium low flame.
Meanwhile, take the larger frying pan, put the remaining butter in it and melt it covering the full pan and just until bubbling over medium low heat flame.
Now the brave part~! Once the small egg pan times at 3 minutes, take a large spatula and mover under the egg to lose it from the pan, then remove the spatula. Now take the small pan with the egg and very quickly flip it upside down so the omelet falls, cheese first onto the larger frying pan. The first few times you do this – some of the cheese may splay outward, just take a spatula and tuck it under the egg. Let this sit over medium-low flame for 3 minutes untouched.
Take the serving plate and put it close to the large pan with the sandwich in it. Take a very large spatula to pick up the sandwich, (swivel it under to loosen it from the pan), while holding with the spatula, flip it right side up (so the cheese part is on top) onto your serving plate. If you did this correctly you will have a crispy egg bottom and a crispy fried cheese on top that seals the ham and cheese inside – see photos below.
Enjoy~!
You will need to use two frying pans to make this dish, one small and one large.
Always measure out and prep your food before cooking.First part frying the egg with all ingredients on top, then you flip it upside down into the larger pan and fry it for 3 minutes, then take it out of the pan with large spatula and flip it right side up onto your serving plate.Ready to eat, the top part is the fried cheese and we all know how delicious fried cheese is~!
I can't stop making this one, I'm already on my third batch in less than a month~! This is a delicious dish that can be made and reheated throughout your week. This recipe is for 8 servings, but you can always cut it in half if you want less. If you do that, note the cooking times will be cut in half as well~! It's very important to have all ingredients, measured out, and ready to go before you actually start the process. You'll need a very large pan, I always use a wok, because it just gives me more room to toss and turn everything. Top with fresh basil and fresh scallions to add extra flavor. Enjoy~!
For the sauce:
Ingredients
1 cup chicken stock or canned low sodium broth
6 tablespoons soy sauce
2 tablespoons of sherry (try to use actual sherry)
2 tablespoons – (low carb – 3 packets of Splenda) sugar or sweetener of choice
1 tablespoon corn starch (or for lower carb; 1 teaspoon Xanthym Gum and 2 tablespoon of coconut flour) – mix this with a tablespoon of cold water for the prep
1 teaspoon of rice vinegar
1 teaspoon of Asian toasted sesame oil
1 teaspoon of crushed red pepper
For the chicken base:
Ingredients
4 tablespoons of coconut oil (divided)
2 teaspoon of Asian toasted sesame oil (divided)
3 tablespoons of corn starch (or for lower carb use 3 tablespoons coconut flour and 1 teaspoon of Xanthym Gum)
1 tablespoon of Old Bay
1 tablespoon of white pepper
1 teaspoon of salt
2 pounds of chicken, your choice, but skinless and boneless chopped into 1/2 inch strips
1 pound of either Oyster Mushrooms or Shiitake Mushrooms – thickly chopped
2 medium red bell peppers (or one large), cut into 3/4 inch pieces
1 large Bok Choy with full leafs, chopped in 1 inch pieces crosswise
4 tablespoons of finally chopped fresh ginger (I use fresh crushed from a jar because it takes a lot of time to grate and crush ginger)
2 garlic cloves, minced
1/4 cup fresh chopped green onions (for garnish)
1/4 cup fresh chopped basil (for garnish)
Directions
The sauce
Get a large jar and add the chicken stock, soy sauce, sherry, sweetener, cornstarch dissolved in water, rice vinegar, sesame oil and crushed red pepper. Cover with lid and shake it well and set aside.
Chicken/vegetables
Directions
Start be rinsing your chicken and then patting it dry with paper towels. This step is very important for the chicken to get a proper sear to it when frying and I learned it from the incomparable Julia Child. Then lightly pepper and lightly salt the strips (because the soy sauce will already add salt to the dish).
Take a large bowl and add the cornstarch, Old Bay, white pepper, salt and mix it all together.
Take the chicken strips and place them in the cornstarch mixture and fully cover all strips of chicken, you’ll need to use your hands to make sure all strips are covered. Discard any remaining cornstarch though there should not be any left if you properly covered all the strips.
Place 2 tablespoons of coconut oil and 1 teaspoon of the Asian toasted sesame oil in a large frying pan or wok. Make sure the oil gets very hot over medium high heat until it is just about smoking.
Take tongs and gently add the strips to the pan, but giving them plenty of room and not touching each other (with 2lbs of chicken you will need to do this in four to five batches using a large wok). Fry the strips for a total of about 3 minutes and continually flip them over with tongs to get each side nicely fried. Take the strips out of the pan and put them in a bowl lined with paper towels to absorb some of the oil. Once all the chicken is in the bowl, pat another paper towel on top, again to absorb some of the oil. Then discard the paper towels. Note: I learned that adding the seasoned starch to the strips before frying – helps to create a scaly base on the meat – so when any sauce is applied it will not run down off the meat but actually ‘stick’ to it. It also makes for extra sear to the flavor of the chicken. Be careful, both the chicken and vegetables will cause these types of hot oils to spatter.
Add a little more of the coconut oil and sesame oil to the pan. Add the Oyster Mushrooms and stir fry about 3 minutes, stirring constantly. Transfer the mushrooms to the bowl of fried chicken strips.
Now add the remaining coconut oil and Asian toasted sesame oil to the pan/wok. Again, make sure it gets very hot, to the ‘just about smoking point’.
Add the Bok Choy and the Red Pepper strips and stir fry for about 6 minutes. You still want your Bok Choy to be crispy not mushy, watch this step closely. When finished, place them in the bowl with the chicken strips.
There should be a slight covering of oil in the pan left (add more if not but only about 2 teaspoons). Place the ginger and garlic in the pan and stir fry for only about 1 minute – you’ll know to stop when it becomes fragrant. Be careful not to fry this for longer than a minute as garlic and ginger can burn very quickly~!
Now place everything back into the pan/wok. Shake your jar of sauce again (flip it upside down and make sure no white starch is stuck to the bottom, shake it until it’s fully mixed) and pour it into the pan and bring to a boil. Reduce heat to a boiling simmer. Stir everything for about 4 to 5 minutes, you don’t want the sauce too watery so let it dissolve a bit – it should start to thicken and everything should be well combined when its ready.
Serve in bowls garnished with chopped green onions, and/or chopped fresh basil (both add extra flavor that is beyond delicious).
Enjoy~!
PS: Pair this delicious dish with a red Francis Ford Coppola Zinfandel~!
Always measure out all ingredients – this can make or break a recipe~!Rinse the chicken and pat it dry with paper towels before cutting into 1/2 inch strips.As you fry the strips, have a large bowl lined with paper towels handy as you will have to do this in 4 or 5 batches with 2lbs of chicken~!When sautéing the veggies, constantly stir them. The Bok Choy should never be over-cooked, not mushy but crispy, the red pepper strips will become steamed in this step.Pair this delicious dish with a red Francis Ford Coppola Zinfandel~!